
Many peoples do not know how to make video from iPhones. In this article, we will see how to use the templates feature in VMaker to make your very first video. The great thing about VMaker is that it contains an extensive range of tools, features and effects that allow you to produce professional quality videos right here on your iPhone.
VMaker Template Features
In this tutorial, we will focus specifically on the templates feature which allows you to get access to an incredible amount of templates with each with their own unique look and feel typography, effects, transitions and music that are a really good place to start when you are making your first video.
Beyond that when you have finished your basic edit in the template; you can go in and make further customizations. So you get a complete unique looking video. In addition to this in future videos I am going to be covering how to use the works tab which is where you can go in and create a custom video from scratch using the videos on your iPhone.
Create Video Template on VMaker
Without any further delay, let us get into it and check out how to create your first video template.
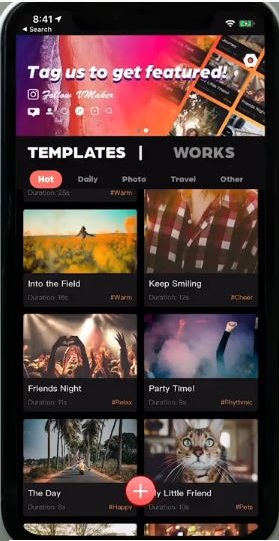
When you first open the app you will be presented with the home screen and you have your templates options on the left hand side and to the right is the works tab where your projects are stored and where you can go in and create new projects from scratch.
But as I mentioned earlier in today’s tutorial, I am going to be taking you through the process of creating a video using one of the pre-configured templates. You will also notice that there is a large plus button to the base of the screen. You could tap on this to create a brand new project. But we are not going to do that today. We are going to tap on one of these templates.
The templates are arranged in different categories from hot to daily to photo travel and others. So there is a number of different template Styles you could select from.
Browse VMaker Templates

Go ahead and have a browse through the templates. Tap on each one of them have a look at the particular style that is being used. Keep in mind that, the templates are using sample footage and all that will be replaced at the touch of a button with your own footage and you can go in and customize certain aspects of the video template.
I found a template that I really like. The look and feel of I am going to go ahead and select that template. Now I am going to go ahead and replace the photos and videos in the template. By default you are taken to your video folder so you can go in and select the videos you would like to include in your project.
Now if you want to select some photos tap on the photo submenu item at the top and go in and select some photos to want to add to your project.
Once you have filled all the slots on the bottom of the screen, you are ready to proceed to the preview mode of your brand-new video template. Tap on next, tap on the viewer window in the middle of the screen and the video will start to play.
VMaker Thumbnail View
You will get a thumbnail view of each of your video clips. If you are happy with the project as is simply tap on the export button at the top and then choose the resolution that you want to save your video to. You can go anywhere from 360 to 480, 720, 1080 and even 4k. You even get the option to change the frame rate of your video.
VMaker Video Frames

That suits different styles of video shooting from 24 for film style, 25 for regular video, 30 and 50 and 60 frames per second for action videos. Then if you are happy, you can save the video down to your album and also save your project. Now you can come back at a later stage to make further edits.
Before we do that, I am going to go back and show you one last thing before we finish this tutorial and that is how to make some basic changes to your template. We tap on the back button and back to our main video editing interface. You will see the detailed editing icon on the bottom right hand corner of the preview window. Tap on it and in this mode, we get to make significant changes to the template and fully customize it the way we want.
Key Features of VMaker
I am going to go into detail in an up-and-coming tutorial. But just to give you a quick overview of what you can actually do by entering this advanced editing section.
- You can make changes to the cuts of the video.
- You can change the length and duration of the clip.
- You can adjust the rotation the speed of your video clips.
- You can remove clip’ so you are not satisfied with and you can also hit the freeze frame feature. So you get a freeze frame effect on a video clip.
- You can add filters over each video clip.
- You can add an opening and closing screen.
- You can also change the music and add sound effects and even record a voiceover.
- You can even add typography to each of your video clips once again we are going to come back to that in an up-and-coming tutorial.
Conclusion Hopefully you found this information useful. If you did feel free to hit me up to comment and do not forget. I will be producing a series of videos on how to use VMaker which are coming up in the not-too-distant future.
